
Step by Step through Clothes Washer Repairs.How to fix washing machine?
A modern clothes washer does more than agitate dirty clothes through a detergent solution. It regulates water temperature, adds bleaches and rinsing agents, fills and empties itself, rinses the clothing and finally spins it damp dry. To perform these varied functions, the clothes washer has become a complicated assemblage of mechanical and electrical parts. Some of these parts are more susceptible to trouble than others.
The water system with its clog prone pump, hoses and valves is the most troublesome, followed by the timer. And although the transmission system, which agitates and spins the clothing, seldom breaks down, other parts associated with it do: The transmission's drive belt can slip, or the plastic agitator can crack or break. With the exception of the transmission, which only a professional should dismantle, most parts can be serviced by a homeowner.
 When the washer does not start, first check out the obvious causes. Make sure the load is evenly distributed, the lid is closed and the machine is plugged into a live receptacle. Also check the lid button or switch. If water does not enter, check that the hot and cold water faucets are on, then look for kinks in the water inlet hoses. Next examine the screens inside the hoses and the water mixing valve for clogging (opposite, bottom) and, with the washer unplugged, test the valve terminals for continuity.
If the machine fills incompletely or overfills, the water level switch is probably malfunctioning. If the washer leaks, check for breaks or loose connections in the hoses to the water mixing valve and the pump. Also inspect the pump, and replace it if it is leaking. If the washer does not drain, the pump may be clogged or stuck, or the drain hose that leads from the tub to the pump may be clogged. Then test the tightness of the drive belt. Finally, test the machine's timer and the motor.
If the. washer does not agitate, the agitator may be slipping on its shaft (opposite, bottom) because the gear teeth are worn. Or the drive belt may be loose or broken. Since agitation does not begin until the water reaches a preset level, the water level switch may be the cause. Finally, check the timer. If none of these parts are faulty, the problem probably is in the transmission.
If the washer does not begin the spin cycle, lift the lid and redistribute the clothing. Close the lid, rotate the timer dial into the spin cycle and start the machine. If the basket does not spin but the motor is running, look for a blockage, such as a handkerchief caught between the tub and the basket. If you find no obstruction, the drive belt may be loose or broken, the basket lock nut may be loose or the transmission may not be working. Also check the timer.
If the washer vibrates a lot, the cabinet may need leveling (opposite, top), or the snubber a pad that absorbs the vibration of the tub may need replacing.
Before taking a washing machine apart, unplug it from the wall outlet. In addition, before disconnecting any water hoses, turn off the hot and cold water faucets to the washer, spread a plastic dropcloth over the floor and have containers ready to catch water draining from the pump and from the hoses.
For safety, a lid switch stops the motor when the lid is raised in some models during all cycles and in all models during the spin cycle. To keep the machine from vibrating excessively, an overload switch stops the motor when the load is unbalanced. In some machines, a snubber a small rubber pad held by an armlike spring rubs along the tub’s top cover to keep the tub from shimmying and hitting the sides of the cabinet. In other models a shock absorbing suspension under the tub performs this function.
If the machine is badly unbalanced, slip a piece of wood under the low corner to hold the machine up while you adjust the leg.


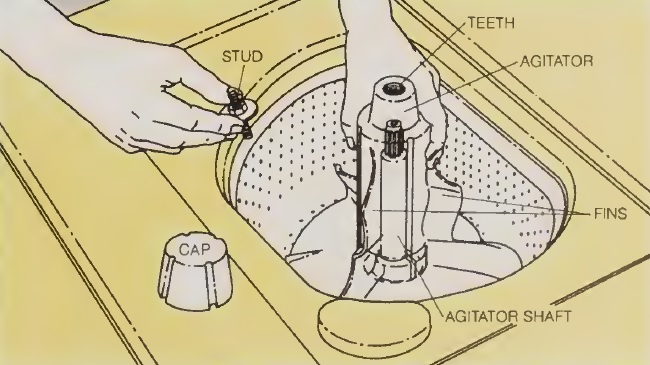
Examine the agitator fins for cracks or breaks: if any fins are damaged, replace the agitator Do the same if the agitator fits too loosely on its shaft. Inspect the teeth inside the top of the agitator column for signs of wear; if the teeth are worn smooth, replace the agitator.

To install a new nut, place it on the agitator shaft and tighten it clockwise, again using a hammer and rod or chisel to seat it firmly.

Next swing the bottom of the front panel up toward you, and lift the panel off its hinges at the top. Then free the top panel from the side panels by removing the screws inside the cabinet that hold the panels together. Swing the top panel back on its hinge, and lean it against the wall or prop it up from underneath.
To replace the wishbone spring, you must begin by unfastening both of its legs from the clothes washer. First free one leg by unscrewing the nut and bolt that secure the leg to the snubber bracket (inset). Then slide the spring's other leg out of the slot in the bracket. Finally, insert the new wishbone spring, and reattach its legs to the snubber bracket.


 Examine the drain hole in the bottom of the tub for blockage (inset). Scrub the tub bottom with a stiff bristled brush to clear it of any mineral deposits that may obstruct the rotation of the basket. Then reassemble the parts, reversing the order in which you removed them.
 Check the switch’s air pressure hose for pinholes and obstructions by following it from the switch to its juncture with the reducer coupling (inset), where the small air pressure hose and the larger water pressure hose meet. If you discover any pinholes in the air hose, pull it off the switch and coupling and replace it.
You should find continuity between a pair of terminals other than the pair that showed continuity in Step 1, above. If your results differ, the switch is defective and must be replaced.


If the small gear does turn, test the timer's mechanical parts. Unplug the washer and reattach the timer motor to the timer.'With the washer lid closed, set the timer to spin and plug in the machine. If the timer does not advance through the spin cycle, replace the timer.
To replace either the timer or the timer motor, remove them as a unit by removing the timer knob, then unscrewing the timer from its mounting on the control panel.


If the pump itself appears to be clogged but cannot be disassembled because it is permanently sealed, replace it. If the pump can be disassembled, remove the screws or clips holding it together (inset), and remove any obstructions. Then reassemble the pump.
Next turn the pulley on top of the pump with your fingers. It should turn easily in both directions. If it does not turn, the pump bearings are jammed, and the pump must be replaced.

 To install a new belt, loosen the mounting bolts (below, right), and pull the motor toward the
drainpipe to make installation of a new belt easier. If the motor will not budge, use pliers to pull it. Slip the new belt around the motor, transmission and drain pump pulleys, following the installation instructions that are provided with the belt made for your clothes washer. Adjust the position of the motor to tighten the new belt, then retighten the mounting bolts.
 To examine the motor pulley, with the machine unplugged remove the drive belt and rotate the pulley in both directions by hand. If the pulley binds, have the motor repaired. If the pulley is loose, tighten the setscrew on the pulley hub; if the setscrew quickly works loose again, loosen the setscrew, slide the old pulley off the motor shaft and put a new pulley in its place.
The water system with its clog prone pump, hoses and valves is the most troublesome, followed by the timer. And although the transmission system, which agitates and spins the clothing, seldom breaks down, other parts associated with it do: The transmission's drive belt can slip, or the plastic agitator can crack or break. With the exception of the transmission, which only a professional should dismantle, most parts can be serviced by a homeowner.

If the machine fills incompletely or overfills, the water level switch is probably malfunctioning. If the washer leaks, check for breaks or loose connections in the hoses to the water mixing valve and the pump. Also inspect the pump, and replace it if it is leaking. If the washer does not drain, the pump may be clogged or stuck, or the drain hose that leads from the tub to the pump may be clogged. Then test the tightness of the drive belt. Finally, test the machine's timer and the motor.
If the. washer does not agitate, the agitator may be slipping on its shaft (opposite, bottom) because the gear teeth are worn. Or the drive belt may be loose or broken. Since agitation does not begin until the water reaches a preset level, the water level switch may be the cause. Finally, check the timer. If none of these parts are faulty, the problem probably is in the transmission.
If the washer does not begin the spin cycle, lift the lid and redistribute the clothing. Close the lid, rotate the timer dial into the spin cycle and start the machine. If the basket does not spin but the motor is running, look for a blockage, such as a handkerchief caught between the tub and the basket. If you find no obstruction, the drive belt may be loose or broken, the basket lock nut may be loose or the transmission may not be working. Also check the timer.
If the washer vibrates a lot, the cabinet may need leveling (opposite, top), or the snubber a pad that absorbs the vibration of the tub may need replacing.
Before taking a washing machine apart, unplug it from the wall outlet. In addition, before disconnecting any water hoses, turn off the hot and cold water faucets to the washer, spread a plastic dropcloth over the floor and have containers ready to catch water draining from the pump and from the hoses.
Anatomy of a clothes washer
When the timer is turned on, the water-mixing valve lets the selected mixture of hot and cold water into the tub until the water level switch stops the flow. Then the agitator, turned by the motor driven transmission, churns the laundry back and forth in the basket. At the end of the wash cycle and again at the end of the rinse cycle, the timer signals the pump to drain the tub and the transmission begins to spin the basket at high speed, squeezing the water out through its perforated sides by centrifugal force. The water drains down through a hole in the tub and is lifted by the drain pump into a standpipe behind the machine.For safety, a lid switch stops the motor when the lid is raised in some models during all cycles and in all models during the spin cycle. To keep the machine from vibrating excessively, an overload switch stops the motor when the load is unbalanced. In some machines, a snubber a small rubber pad held by an armlike spring rubs along the tub’s top cover to keep the tub from shimmying and hitting the sides of the cabinet. In other models a shock absorbing suspension under the tub performs this function.
A Lopsided Cabinet Leveled
Adjusting the legs
Rock the cabinet from side to side to determine which side is lower. Then set a carpenter's level along the front edge of the cabinet top, and raise the lower side by reaching beneath the cabinet to extend the legs on that side either by twisting them or by loosening lock nuts on the legs and sliding them farther out of their sockets. Next level the cabinet from front to back by placing the level first along one side of the cabinet, then the other, while adjusting both front legs and both rear legs.If the machine is badly unbalanced, slip a piece of wood under the low corner to hold the machine up while you adjust the leg.

Obstructions That Stop the Flow of Water
Cleaning screens
Using pliers, unscrew the two water hoses from the water mixing valve on the back of the machine and, with a small screwdriver, carefully pry out the screen inside each inlet; be careful not to damage the screens. Also pry out any screens inside the hoses. Clean the screens under running water and reinsert them. Reattach the hoses. Before tightening the hose coupling, run your hand along each hose from the house plumbing valve to the water mixing valve, to check them for any bends or kinks that could obstruct the water flow.
What to Check When the Agitator Fails
Replacing the agitator
Remove the agitator from the agitator shaft either by pulling it upward to slide it off the shaft or by unscrewing a plastic cap that holds the agitator down. In the example shown here, the cap covers a threaded metal stud and nut assembly. To take off this stud, turn the nut with a wrench until the stud can be freed from the shaft. Then pull the agitator straight up. If the agitator does not budge, rock it at its base or enlist a helper.Examine the agitator fins for cracks or breaks: if any fins are damaged, replace the agitator Do the same if the agitator fits too loosely on its shaft. Inspect the teeth inside the top of the agitator column for signs of wear; if the teeth are worn smooth, replace the agitator.
The Critical Lock Nut That Secures the Spinning Basket
Removing the nut
To loosen the lock nut that secures the basket to the agitator shaft, remove the agitator and wedge a blunt tool, such as a steel rod or a cold chisel, in one of the notches at the edge of the n ut. Hit the tool with a hammer to move the lock nut counterclockwise. If the lock nut is corroded, spray it with penetrating oil and wait a few minutes before attempting to dislodge it.To install a new nut, place it on the agitator shaft and tighten it clockwise, again using a hammer and rod or chisel to seat it firmly.

Getting Inside a Washer
Releasing the hinged top panel
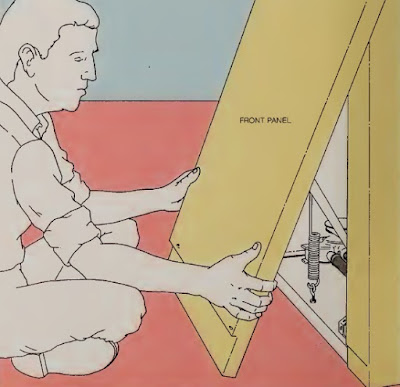
If the top panel is held down by tabs, use a putty knife to free it; if it is held by visible screws, remove them; if the screws are hidden, remove the front panel to gain access to them. To do this, remove the screws located under the lip of the kickplate at the bottom of the front panel.Next swing the bottom of the front panel up toward you, and lift the panel off its hinges at the top. Then free the top panel from the side panels by removing the screws inside the cabinet that hold the panels together. Swing the top panel back on its hinge, and lean it against the wall or prop it up from underneath.

A Cure for Vibration: The Snubber
Replacing the snubber
After raising the top panel, disassemble the snubber assembly by lifting the snubber’s wishbone shaped spring off the top of the snubber. If the snubber sits on a friction pad, run your fingers over the pad; if the pad feels sticky or is caked with detergent, clean it with an emery cloth or sandpaper. If the snubber is worn, replace it.To replace the wishbone spring, you must begin by unfastening both of its legs from the clothes washer. First free one leg by unscrewing the nut and bolt that secure the leg to the snubber bracket (inset). Then slide the spring's other leg out of the slot in the bracket. Finally, insert the new wishbone spring, and reattach its legs to the snubber bracket.

Testing a Water mixing Valve
Replacing a faulty valve
With the washer unplugged, test the water mixing valve for continuity with a multitester set at RX1. To gain access to the valve, remove the top panel and unhook the wires from the valve terminals. Test both pairs of terminals; if either pair shows no continuity, disconnectthe valve and replace it. To do this, first remove the two hoses from the valve inlets on the back of the machine, then remove the single hose from the valve outlet inside the machine. Unscrew the valve from its mounting on the back of the machine. In order to install a new valve, reverse the steps of this procedure.
A Routine Inspection for Obstructions in the Tub
Lifting out the basket
To examine the tub, you must first free the basket from the agitator shaft. Raise the top panel, then remove the agitator, the snubber and its wishbone spring, the tub cover, and the lock nut on the agitator shaft. Next loosen the basket from the agitator shaft by having a helper rock the basket back and forth, or dislodge the basket by striking the basket's flared top in the center sharply with a hammer and a scrap of wood. If the agitator shaft is rusted or corroded,lubricate it with penetrating oil to loosen it. Then, once the basket has been loosened, you will be able to pull it straight up, off the shaft, tb lift it out of the machine.
For Water Trouble, Check the Water Level Switch
Testing the switch in the empty position
If the tub overflows or does not fill at all, unplug the machine and siphon or bail out any water standing in the tub; then remove the backplate from the control panel. Disconnect the wires from the terminals of the water level switch, and test the terminals for continuity. The tester should show continuity between only one pair of terminals; mark that pair with tape. If there is no continuity at any pair of terminals, the switch is defective and must be replaced.Testing the switch in the full position
Pull the air pressure hose off the neck of the water pressure switch, and attach a shorter length of hose of the same diameter. Blow gently through the hose and listen for a clicking sound. Then blow into the hose again, simultaneously testing the switch terminals for continuity.You should find continuity between a pair of terminals other than the pair that showed continuity in Step 1, above. If your results differ, the switch is defective and must be replaced.
A Dry Run for the Timer and the Timer Motor
Testing the timer’s electrical circuit
Unplug the washer and unscrew the control panel and the backplate. Disconnect the two wires of the timer motor from their terminals on the timer, and clip the probes of a multitester set at 250 volts to the terminals. Close the washer lid, rotate the timer knob to the spin cycle, turn the machine on and plug the washer into the wall outlet. If the multitester does not show the same voltage tested at a standard wall outlet, the timer has an electrical defect. If the voltage reading is correct, proceed to test the timer motor.
Testing the timer motor
Unplug the clothes washer and reconnect the timer motor wires, disconnected in Step 1, above, to their terminals on the timer. Unscrew the timer motor from the timer, revealing the small gear on the underside of the timer motor. With the washer lid closed, set the timer on the spin cycle, turn the washer on and plug it in. Observe the small gear; if it does not turn, replace the timer motor.If the small gear does turn, test the timer's mechanical parts. Unplug the washer and reattach the timer motor to the timer.'With the washer lid closed, set the timer to spin and plug in the machine. If the timer does not advance through the spin cycle, replace the timer.
To replace either the timer or the timer motor, remove them as a unit by removing the timer knob, then unscrewing the timer from its mounting on the control panel.

Cleaning Out the Drain Pump
Removing the drain pump
With a helper, lay the washer face down on a padding of soft rags, exposing the underside of the machine. Disconnect the hose clamps with pliers, and slip the drive belt from the pump pulley. Remove the pump by unscrewing its mounting bolts with a socket wrench. Lift the pump out of the machine, and place it on a sheet of plastic to catch any dripping water.
Cleaning the pump
Working above the plastic sheet, clear the hoses of any obstructions. Also clear the pump protector tube, if your machine has one; the protector tube traps small objects such as handkerchiefs and babies' socks.If the pump itself appears to be clogged but cannot be disassembled because it is permanently sealed, replace it. If the pump can be disassembled, remove the screws or clips holding it together (inset), and remove any obstructions. Then reassemble the pump.
Next turn the pulley on top of the pump with your fingers. It should turn easily in both directions. If it does not turn, the pump bearings are jammed, and the pump must be replaced.

Adjustments tor the Tension of the Drive Belt
Tightening or loosening the drive belt
Unplug the washer and disconnect its hoses, remove the back panel, then lay the machine face down on a padding of soft rags, exposing the motor and the drive belt, which are at the bottom of the washer. Press the drive belt; it should have about Vi inch of play. If it is slacker than this, tighten it by repositioning the motor To do this, loosen the motor mounting bolts with a socket wrench (below, left), and slide the motor away from the drain pump; then retighten the bolts. Make certain that the drive belt is positioned securely in the pulleys.
drainpipe to make installation of a new belt easier. If the motor will not budge, use pliers to pull it. Slip the new belt around the motor, transmission and drain pump pulleys, following the installation instructions that are provided with the belt made for your clothes washer. Adjust the position of the motor to tighten the new belt, then retighten the mounting bolts.
Examining a Motor for Flaws
Testing the motor switch
Unplug the washer. To reach the terminals on the motor, you must remove the back panel and, in some cases, place the washer face down on a padding of soft rags. Next clip the probes of a multitester set at 250 volts to one pair of terminals. Slip the drive belt from the motor pulley, close the washer lid, rotate the timer knob to the spin cycle, turn the machine on and plug the washer in. Check each combination of terminals, unplugging the washer when you move the probes from one pair of terminals to another; do not touch the machine when it is plugged in. If you find current in at least one pair of terminals but the motor is not running, the motor is faulty. If you find no current at the motor switch, the problem lies elsewhere in the washer.


Good post for both consumer and technician. In fully automatic washing machine water overflow is an issue. First thing to do is to check if the water runs even if the machine is stopped. If yes then inlet valve might be the problem. If not then would have to check the machine through a technician. Worked in samsung service center in Chennai for years and know that this is a very common issue.
ReplyDeleteHi dear,
ReplyDeleteThank you for this wonderful post. It is very informative and useful. I would like to share something here too.Quality appliance repair for Eastern Massachusetts, Boston, Newton, Woburn, Framingham and surrounding areas. We service all brands and types of Major Kitchen and Laundry appliances.
Same Day Appliance
My programmer is trying to persuade me to move to .net from PHP.
ReplyDeleteI have always disliked the idea because of the costs.
But he's trying none the less. I've been using Movable-type on a number of websites for about a year and am concerned about switching to another platform.
Bosch Washing Machine Repairs
Miele Dishwasher Repairs
Amazing tips buddy, but still a repair or a service check may be necessary if your appliance stops working at its peak performance. Call a qualified appliance repair specialist to restore your appliance to its best condition.
ReplyDeletewasher & dryer are complex electronic appliances. If you don’t have the time, skills, tools, or experience to maintain or repair your LG fridge, call on One Stop Appliance. We’re your authorized washer & dryer repair services company in Washington DC, Maryland and Virginia.
No doubt this is an excellent post I got a lot of knowledge after reading good luck. When any oven repair fails to heat the meal well, its atomizer ought to be replaced. This will be easily completed by a homeowner via a screwdriver to eliminate the heating elements from oven's lower and upper walls.
ReplyDeleteTo find real service centers like Samsung Service Center, LG Service Center, Hoover Service Center, and Daewoo Service Center in Abu Dhabi you should contact OVEN REPAIR ABU DHABI .
ReplyDeleteWe are confident that we can provide you with the best appliance repair services. we try and find the best solution for you. Overall there are several reasons that make MKA Repair Services Abu Dhabi the ideal choice for appliance repair in the ABU DHABI UAE.
Nice post with informative and good quality content. Thank you for sharing this information with us. This is really helpful. Also check Sub Zero Appliance Repair
ReplyDeleteIf your Washing machine, Dishwasher or Dryer has stopped working, you need professional help. This is where we step in to repair your appliances.
ReplyDeleteWith all the experience and expertise, we are a service to rely on. For an extended life of an appliance, its maintenance is important. However, if your appliance is causing trouble, we are here to provide any Miele Dishwasher Repairs.
Washing Machine Repair in Ludhiana - Reliable washing machine repair services in Ludhiana address issues like water leakage, motor faults, and drum malfunctions. Skilled technicians ensure efficient repairs for all brands and models, using quality parts and modern tools. With prompt service and affordable rates, they guarantee smooth functioning of your appliance, ensuring convenience for residents.Visit: Refrigerator Repair in Ludhiana
ReplyDeleteMicrowave Repair in Ludhiana
Home Appliances Repair in Ludhiana
Ludhiana Repairs
Washing Machine Repair Noida - Searching for top washing machine repair service in Noida at affordable prices. Our washing machine technicians can rectify washing machine issues like drum noise, dryer problem, washer issue, water drainage, PCB, washer and power faults. Visit: Refrigerator Repair Noida
ReplyDeleteMicrowave Repair Noida
Dishwasher Repair Noida
Washing Machine Repair - Find the top washing machine repair in service Faridabad with, trustworthy solutions for all washing machine brands such as Samsung, LG, Realme, Bosch, IFB etc.. Our professionals diagnose and fix issues such as wash cycle failure, water leakage, unusual noise, PCB, water drainage, and electrical faults. Visit: Microwave Repair
ReplyDeleteRefrigerator Repair
Dishwasher Repair
Washing Machine Repair in Faridabad - Find the top washing machine repair services in Faridabad at doorstep. We offer trusted and affordable washing machine repair services in Faridabad. We specialize in fixing various washing machine issues, including motor issues, leaks, gear box, spine motor, and electrical faults. Visit: Microwave Oven Repair in Faridabad
ReplyDeleteRefrigerator Repair in Faridabad
Refrigerator Gas Refilling in Faridabad